Old Jeans to Burp Cloth

Max Burpie Halved 

Remember the tea stained/stamped onesie?  Well, here is the 2nd half of baby Max’s gift. 

Max Burpie

Max Burpie Close

His mom has a FABULOUS sense of style and likes non traditional things.  I used a pair of Jack’s old jeans that had a HUGE hole in one knee and the beginning of a hole in the other knee.   The knit “patch”… old tee shirts of mine!  There’s a double row of topstitching around the hand stamped “max” and an urban flare topstitching around the red part of the patch. 

Max Burpie Tope


The bottom seam of the jeans is the top of the burpie.


Max Burpie Hole


The thread bare “knee” gives a unique touch.


This is definitely a one of a kind type of gift that no other mommy on the block will have!  Try it the next time you need a baby boy gift. :)

Linking up to a few of these par-tays!

Hand Stamped and Tea Stained

Finley Stamped Shirt Top Max Stamped Onesie Close up

I’m ALWAYS on the lookout for cute unique clothes, especially when it comes to boys.  Today, a light bulb went off in my head!!  I read an article a couple of weeks ago about tea staining paper.  As I was watching the little two play on the porch, I thought… “Hmmm, I wonder if it would work on white shirts?”  The effect is EXACTLY what I wanted.  YES!!

Finley Stamped Shirt Max Stamped Oneise

The “f” shirt is for Finley and the “max” shirt is a custom order.  I left Finley’s in the tea quite a bit longer than Max’s, but I do like the look of both.  I had an old shirt of mine that was stained and waiting for Goodwill.  I knew it would be perfect for my creative inspiration.  I got out my stamps, brushed on a bit of black acrylic paint, and stamped away.  :)  I cut roughly around the “f” and the “max,” applied steam-a-seam to the under side, and ironed them on the tea stained shirts.  I then top stitched with black thread… ta-dah!

Max Stamped Onesie Close Finley Stamped Shirt Close

Finley’s puckered up wee bit along the left edge… I didn’t put the steam-a-seam all the way to the edge of the fabric.  I’m WAY thankful I did that on Finn’s and NOT the custom order.

I can’t wait to make more!!

Linking up to a few of these parties… You know you wanna party too

~Have a great weekend~

New Cozy and Handmade Wednesday Hop

I have a NEW cozy in my etsy shop

tweettweet top Tweet bottom

“Won’t tweet ‘til this cup’s complete”

I’m horrible at making up catchy phrases… I really liked the little birdie and wanted to use him somehow, someway. :)

It’s also time for:

My blog is co-hosting this week! :)  You can have a chance to co-host as well!  Link up your crafty blog here:

If you have a handmade store, link up here: (make sure you specify etsy, artfire, or personal)

Happy Wednesday to you.

Totally Random

Coconut Deodorant Powder

I am completely in love with LUSH coconut deodorant powder.   After I got out of the shower today, I realized that I’m almost out.  CRAP!   That means I have to drive into Atlanta to get more. 

I can’t go a day without it, seriously.

Hmph…

I Pad Cover from Sew Poshy

I got the sweetest little email over the weekend!!  Sew Poshy lurved my little flowers (here and here) so much that she made one for her I Pad bag!!  I think it’s simply divine.  The color combination is beau.ti.ful.

She has sooooo many beautiful projects that she has done on her blog… check it out. :)

Leave her some comment love while you are there… it will make her day.

Burlap, Tulle, and Flowers {Oh, and my Shelf Makeover}

Shelf Decorated After


Emily has been wanting a book shelf in her room for quite some time.  She has a shelf, but it’s a corner shelf and the books ALWAYS fall over.  If they aren’t falling over, the smaller ones get squeezed behind the bigger ones, the pages get all crinkly, etc, etc. 


Low and behold, I found this lovely at an antique store!Shelf Before Shelf After

Didn’t it clean up beautifully??  I haven’t actually completed a project like this before… so I was pretty darn excited that Baby Girl liked it.

I sanded, puttied, and sanded some more.  Then I primed it with KILZ as it had a bit of a musty old wood smell.

Shelf MidwayI added some trim that I found at Home Depot at the top and also two wooden rosettes at the bottom corners.  A fresh coat of white paint, a little sanding on the edges for a distressed look, and then FUN time!

Shelf Top Left Shelf Bottom Corner

I knotted a strip of purple tulle for the sides of the shelf.  Em’s room is FULL of tulle and flowers.  So, naturally, she wanted flowers on her shelf… purple and white to be precise.  The flowers looked a little lonely, so I hot glued a strip of burlap haphazardly behind them. 

Tulle + Burlap = True Love (just my opinion, anyway).

Shelf Tulle Close Up

I moved the shelf into her room today…

Shelf in Room BW

Linking up HERE!!

Flower Envy

Pink Flower

Baby Girl saw Havanna’s shirt and decided that red and yellow were NOT the way to go… it needed to be a combination of dark and light pink.

I surprised her with this lovely when she got home from school today!  She was completely stoked (which made her mummy VERY happy).

Pink Flower Side 

I used two organza layers in addition to the satin this time  around.  I really enjoy different textures and fabrics, so I used netting instead of tulle with this fabric combo.

Pink Flower Shirt 2 

I am toying with the idea of selling these in my Etsy store.  I’m thinking I need a bit of variety…. hmmmm (ponder, ponder, ponder)…

On that note, have a GREAT weekend!!

Linking up to a few of THESE parties….  They provide me with so much inspiration. :)

Silver and Pearls {and a Blogger Feature}

Earrings Close bw LO

I love jewelry… what girl doesn’t, right?  I will freely admit I’m quite picky when it comes to what I will actually wear when it comes to my goods.  Val over at Miss Val’s Creations makes the most beautiful pearl and silver earrings (among many many other fabulous creations)  and I knew I had to have to them. 

Earrings

I can’t remember if she found my blog first, or I found her initially, but I think it’s safe to say we are bloggy friends at this point. :)  She always leaves me the sweetest comments on my posts and I hang on a cliff waiting to see her newest creations.

 Earrings Vintage LO

I FINALLY had a little bit of extra money in my PayPal account this past month and rushed over to Miss Val’s Creations Artfire Store to buy the prize I had been eyeing for some time.  She definitely exceeded my expectations and I wear these beauties at least 3 times a week… they match EVERYTHING (especially my Stella and Dot lovelies). 

Sometimes, it’s nice to know when someone appreciates what you do… 

So…

THANK YOU, Val,  for making such a wonderful and quality HANDMADE product.  I really really {heart} my earrings.

Spring is IN the air

Red Flower off centered

I’m absolute ready for SPRING!! 

Red flower center detail Can you tell??  I have had these little flowers dancing around in my head for over a week now but HAD to finish all the heart day stuff before I could initiate yet another project.

red flower stitching detail Red flower full view

This little onesie is a birthday gift for a dear friend’s daughter.  Havanna is all about Minnie Mouse these days… thus the red and yellow inspiration for her shirt.

Oh, and btw, these guys are easy peasy to make.  Cut out a few circles (different sizes) of polyester fabric you like, pass the edges of the fabric over a flame to “seal” them (so they won’t fray), and arrange the circles to your liking.  You can either stitch them in the middle or use a fabric glue to attach the circles permanently.  For the center, I sewed a basting stitch down the middle of yellow organza ribbon and gathered it tightly.  Then, I sewed it to my flower and accented the middle with a few pearls.  I used the same ribbon technique for the leaves only I gathered loosely this time around.  I shaped each green ribbon into a “leaf,” so to speak, and attached them to the flower.

Red flower Top view Red Flower Bottom View

I stitched around the largest circle twice in a not-so-perfect circle shape whilst backstitching here and there to create the look I was going for.

Red Flower Left View


You want one for yourself, don’t you? 

It’s ok. 

I do to! :)

Linking up to a few of THESE parties… check them out for more inspiration.

D-O-N-E Just in Time!

I actually finished all of the kids’ school valentines BEFORE midnight!!  I’m patting myself on the back. :) 

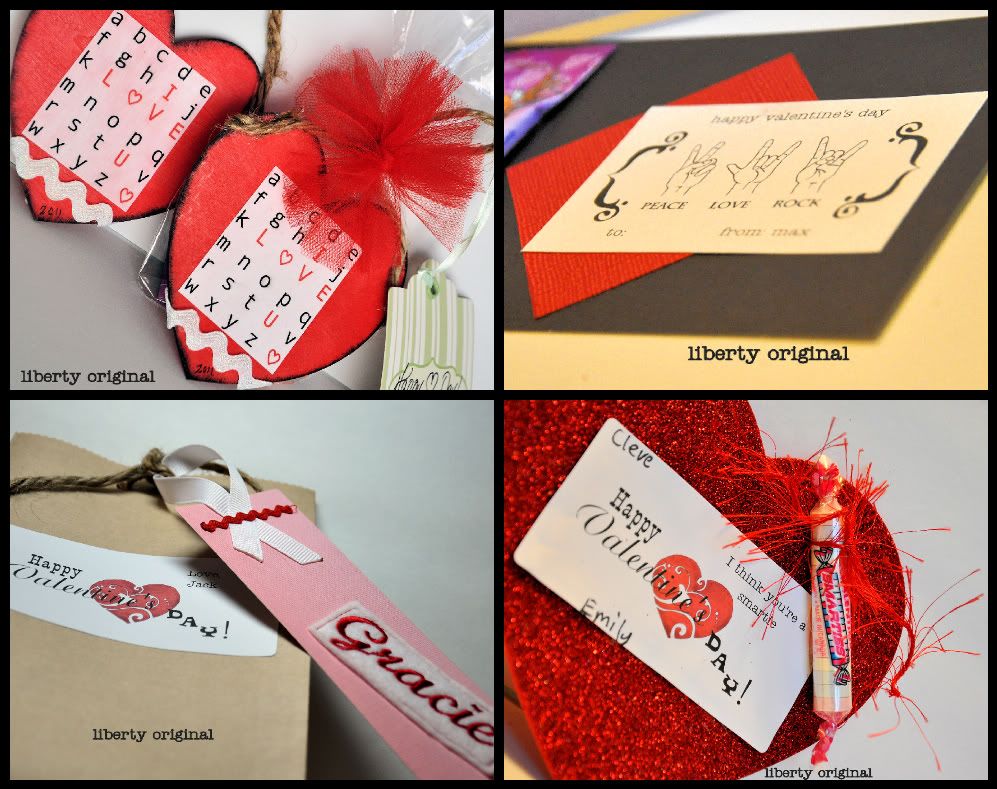
Those wooden hearts that jumped into my cart sure came in handy this year.  I used them to make Finley’s class valentines with a super cute “I Love You” printable I found on someone’s blog.  I can’t remember whose though… so, if you know, PLEASE leave a comment or email me so I can give proper credit!! 

I used the “Peace, Love, Rock” digital art from Urban Threads , a little card stock, and spray adhesive for Max this year.  It’s his LAST year to exchange love notes as a class.  Man, I feel OLD!

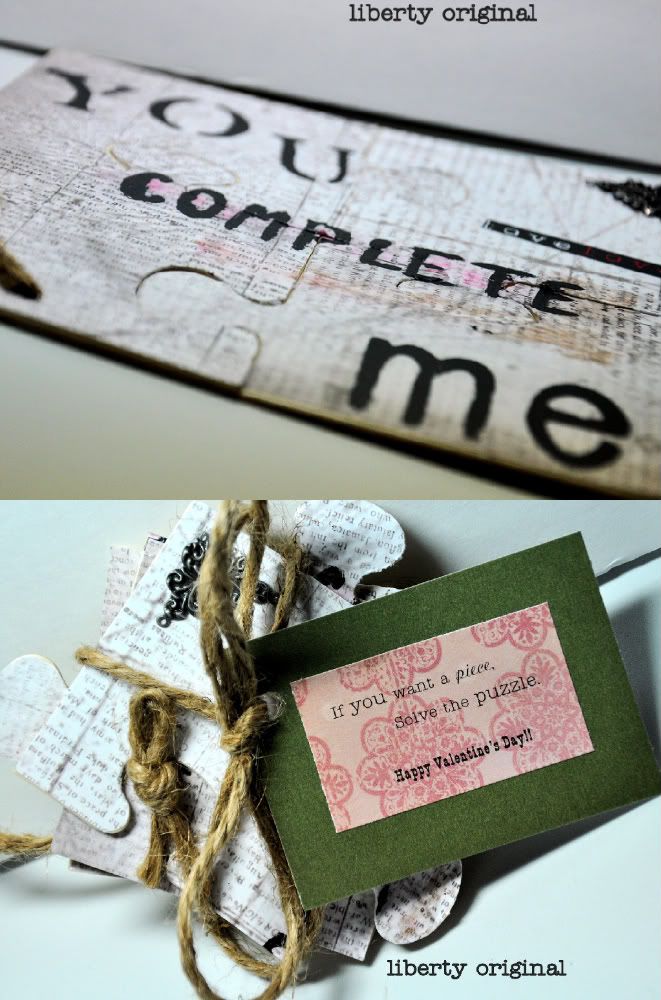
Jack’s goody bag definitely evolved as the evening progressed.  I had all the fun things for the bag, but didn’t know quite how to present it.  I was originally going to make little felt bags for everyone, but ran out of time.  Then, I was just going to do felt name tags.  They ended up as bookmarks!  I think they turned out super cute, so I’m going to do a tutorial on how to make them. :)

Emily had hers planned out for about a month.  She came up with the phrase, “I think you’re a smartie” so she could give out her FAV candy.  She rocked the low temp glue gun, btw.

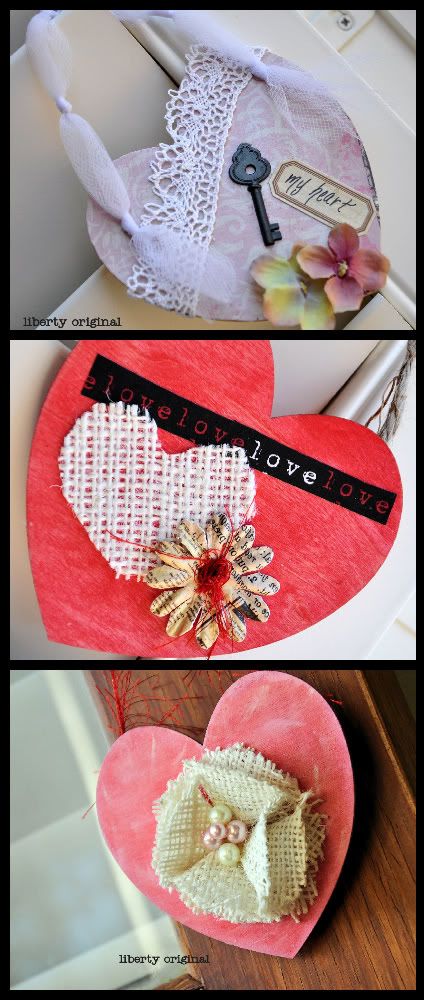
The wooden hearts ALSO turned into teacher Valentine’s this year.  I tried to incorporate each teacher’s personality into their heart.  It’s amazing how paint, burlap, mod podge, and scrapbooking supplies can transform plain wooden shapes. 

I really had fun this year for Valentine’s Day!!  I’m a wee bit sad that it will be over in 24 hours.  I guess I can always start planning for next year. ;)

Linking up here…. check out these awesome parties!

Win a LO Cozy at Night Owl Crafting

Leslie at Night Owl Crafting is hosting a GINORMOUS giveaway for her blogiversary. 

NightOwlCrafting

I love reading her blog and volunteered to giveaway one of my cozies to help her celebrate.  There are over 30 giveaways to enter!!  Head on over, enter to win one of my cozies, and check out the other cool products.  You have until Sunday, February 13 to enter to win. :) 

Zebra cozy


Here is one of Leslie’s favs.


Black Geometric


Here is one of my favs.


But, there are plenty to choose from!!  I’m still offering a 25% discount for my readers…  just enter “NEW25” at checkout in my Liberty Original etsy store to receive your savings.

Have a great weekend my loves.

ADULT Valentine :)


Kristen over at Make the Best of Everything totally inspired this goody for hubs.  She made the cutest puzzle with puffy paint!  I knew I could Mod Podge this bad boy and so I gave it a try…

I came up with a really original saying for my puzzle… You Complete Me.  I know, I know, but nothing else came to me!!  A little bit of stamp action, some freehand painting (which I know better than to attempt), and a tish of stenciling yielded me the result I was aiming for.  I topped it off with a “love knot” out of jute in the lower left corner and a little jewelry embellishment in the upper corner.
Now, for the fun part…
 
the tag!  “If you want a piece, solve the puzzle.” (Thus, the adult disclaimer in the title.)  I thought this idea was just TOO STINKIN’ CUTE to pass up. 
After you complete your puzzle, place on your significant other’s pillow Valentine’s Day Night:
Puzzle Bed
and  you never know what might happen … :)

Linked up Here:
Iron Violet Designs Lovely Crafty HomeJoin  us Saturdays at tatertotsandjello.com for the weekend wrap 
 up           party! Paper Issues Blog Design

UndertheTableandDreamingPhotobucket The DIY Show Off