
So, please bear with me. I am figuring out this whole posting via email thing. I take so many pics with instagram these days and would love to share them with all of you!!










www.flickr.com
|
|
Add this to your site |





For this project, paint the hand and a little of the forearm brown so you have the tree trunk and the branches when you place the hand/arm on the paper. Next, squirt a tish of green paint along the bottom and let your child use his/her fingers to make the grass. I let little man make the leaves out of his tiny finger prints in red, orange, and yellow all on his own.


Each child has their very own stamped name plate that will be attached with mini brads. Kids are sooooo proud of their artwork and need something fancy now and then to accent it!! (imo anyways)
Linking up here this week!!

I really got excited this year for the Halloween snacks… didn’t plan on it but it just kind of happened. When I was shopping for the bananas for my banana ghost/buddies, I found these yummy looking little brownies. I knew the kids would love them and the spider brownie idea was born.

All you need is mini brownies, pretzel sticks for the legs, and butterscotch chips for the eyes.

Place the pretzel sticks in the brownie for the legs.

Then squish the butterscotch chips pointy side down to make the eyes.

Ta Dah….. Brownie Spider!!
Okay, I know food posts are NOT my forte, but these little snacks were just too cute not to share. I promise to get back to my sewing craftiness soon. Thanks for indulging me my friends.

Aren’t they cute?? A yummy and healthy Halloween treat!
You want to make them with your kids don’t you?
Well, of course you do so here’s how:

Supplies:
Banana (I cut them in half as I did this as a snack in Jack’s kindergarten class… 11 bananas are ALOT cheaper than 22!)
Mini chocolate chips
Regular chocolate chips
You may even have all the supplies you need at home already. :)

Peel the banana.

When placing the chocolate chips in the banana, push the pointed tip into the banana so it will stick in well.

Insert two mini chocolate chips for the eyes.

Place one large chocolate chip under the eyes for the ghost mouth.

That’s it! You are done!!
You can adapt this yummy snack for a year round treat. Em was still hungry after she ate this one.

So, she made a banana buddy next.

The kids can randomly stick the chocolate chips all over the banana for a “buggy” affect.
I mean, honestly, we all know that chocolate and bananas go fabulous together. This is easier to make and much healthier than a banana split. So, hand over the chocolate chips

and let those kids create!!!!

The first time I saw a little foot turned into a ghost was when I got a little one made from foam in the mail. It was so stinkin cute!!! Impressed, I thought to myself, “I’m going to do that!”
Never happened.
Then, I saw this:

Source: thejohansonjourney.blogspot.com via Janette on Pinterest
Two days later, my son’s kindergarten teacher asked me if I would be interested in doing a Halloween craft for the class.
SWEET!!!! LITTLE GHOST FEET!!!!
was all that ran through my mind for a split second. I was very excited when she liked my idea. :)
Just in case you haven’t seen this around… all you need is white paint, black paper, and supplies to make the ghost face and VOILA! You have preserved your little one’s foot forever.

The kiddos were giddy the WHOLE time I was in the classroom which was super cute. (Yeah, I let a bunch of 5 year olds sweet talk me. Some of them are smooth talkers already! God help their future girl/boyfriends, seriously.) I helped them with the footprint and let them create their own face with googly eyes and a black crayon.

Then, I punched holes along the bottom of the cardstock and threaded a ribbon through the holes.

Each picture is topped off with a little poem that my sister and I made up together over the phone.

The little boy ghosts have a blue sparkly bow tie and the little girl ghosts have a pink sparkly hair bow (sparkle makes everything more beautiful… just ask Bella!)

I was so impressed with each child’s creativity. Even more, I feel so blessed that I was able to share in making this memory with all of them.

So, if you haven’t done this craft with your own kids yet…
GO, DO IT NOW!
I wish I would have done it several years ago the first time I saw it. I am definitely doing it with all of my kids this year (even though Max’s foot is the same size as mine).

If you are like me, it’s difficult to decide which kids’ papers to keep and which to throw away. Not to mention if Jack sees anything in the trash that he brought home, it is MELTDOWN central. One time he actually said through broken sobs,
“You broke my heart.”
Yeah, I know… a punch in the gut…
To avoid school paper clutter on my kitchen counters, each child has their own plastic box to hold their individual papers. These came from Wal-Mart for $3.99. I’m not sure of the exact size, but an 8 1/2 x 11 sheet of paper fits flat in the bottom.
Max didn’t have very many papers to save from 5th grade so I was able to use the same box for 6th grade!

You know I LOVE to use mailing labels for my projects. I used my clipart and print shop software to transform these 2” x 4” shipping labels into the cute labels for the boxes. Each year I choose a stick kid/picture that reminds me of my kiddo at that season in his/her life. I add their name, school year, school grade, and teacher. I even put their report cards, awards, valentines, etc in there so I know exactly where to find everything for that particular school year. When I get around to scrapbooking an album of their school years, I will have it all right there stacked neatly in their closets. :)

After they show me their school work for the day/week, they know to put it away in their box! It really is a win/win solution to the school paper clutter. :) My daughter enjoys going back through her old boxes and reminiscing. It’s cute when she says, “Look at this. I was so little when I did it.”

at least I made something today!!







Late Thursday afternoon, Baby Girl told her lovely Mum that she needed a large colorful crazy hat for Friday…. as I’m trying to get her ready for gymnastics, Jack ready for his soccer game, Max ready for baseball practice, and some sort of nourishment prepared for everyone’s tummy. She quickly picked the fabric (canvas for the hat and two beautiful batiks… she does have good taste :)) and described her vision.

So, after I got everyone to bed that evening, paid bills, and was just about ready for bed myself, I remembered the hat… (insert word of choice here). Flashbacks of the excitement on her face as she told me what she wanted… the giddiness only a child can portray over getting to wear a hat to school flood my entire being with guilt. I made a promise. I must keep my word even though it is after midnight and I’m exhausted.

I tore strips of fabric (an even number I think) and just started creating. She wanted a “big glob of fabric” on the front of the hat and “things hanging off” the side. I’m thinking… I can do this…

I braided fabric for each side of the hat and pinned them on. Then, I knotted a strip of fabric, formed it into an “E”, and hot glued it between the braids.

I sewed two strips of fabric together length wise, ruffled one edge, and hot glued that bad boy to the front of the hat to make a GINORMOUS rosette. I think that definitely satisfied the “big glob of fabric” request.
So, at 2 am, I placed the hat at her place at the table so she would see it first thing in the morning. Even though I couldn’t see straight 4 hours later as I was getting breakfast ready, the “Oh, Mommy…. It’s perfect! Thank you,” made it worthwhile. :)
Linking up here this week!
I haven’t been posting as my sister and her family are here from Colorado!!! This picture was TOO FUNNY not to share with everyone. Jack and Cameron were very excited to have their pic made with the wrestling pigs. :)
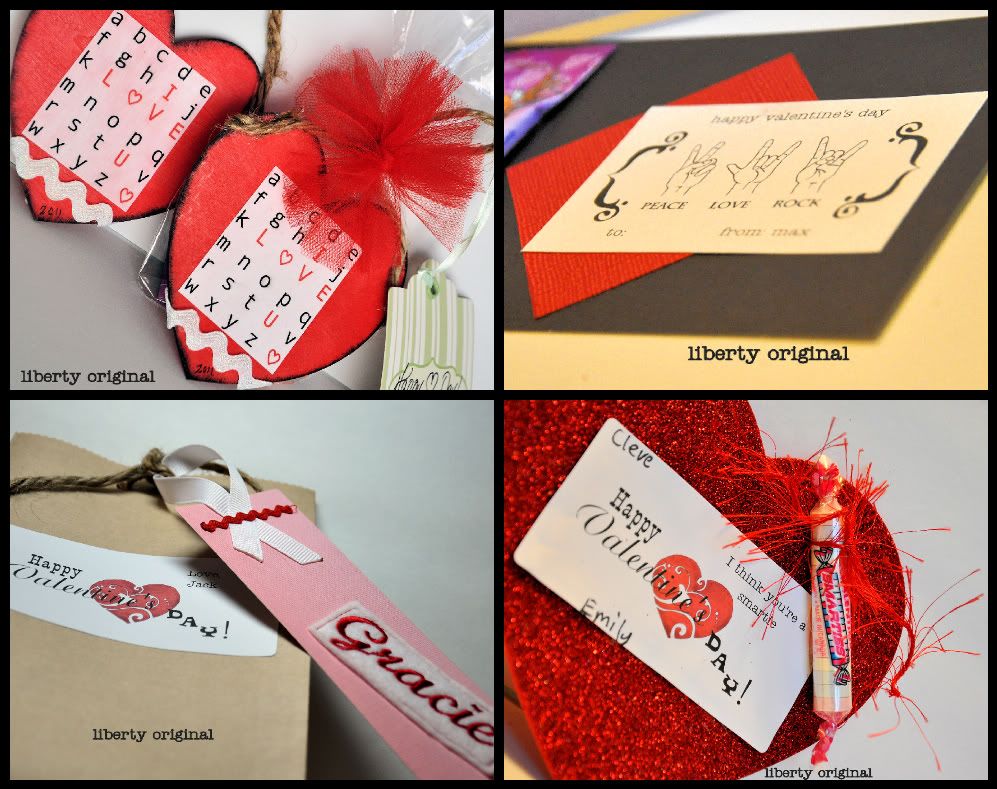
I actually finished all of the kids’ school valentines BEFORE midnight!! I’m patting myself on the back. :)
Those wooden hearts that jumped into my cart sure came in handy this year. I used them to make Finley’s class valentines with a super cute “I Love You” printable I found on someone’s blog. I can’t remember whose though… so, if you know, PLEASE leave a comment or email me so I can give proper credit!!
I used the “Peace, Love, Rock” digital art from Urban Threads , a little card stock, and spray adhesive for Max this year. It’s his LAST year to exchange love notes as a class. Man, I feel OLD!
Jack’s goody bag definitely evolved as the evening progressed. I had all the fun things for the bag, but didn’t know quite how to present it. I was originally going to make little felt bags for everyone, but ran out of time. Then, I was just going to do felt name tags. They ended up as bookmarks! I think they turned out super cute, so I’m going to do a tutorial on how to make them. :)
Emily had hers planned out for about a month. She came up with the phrase, “I think you’re a smartie” so she could give out her FAV candy. She rocked the low temp glue gun, btw.
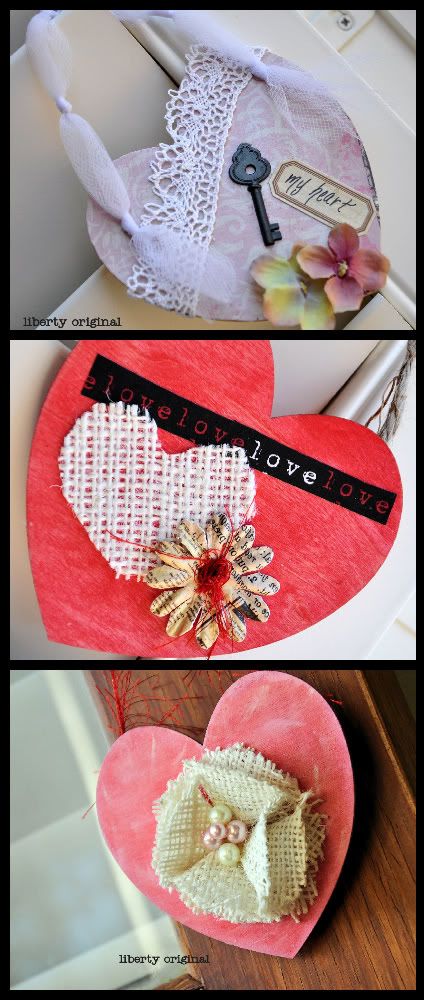
The wooden hearts ALSO turned into teacher Valentine’s this year. I tried to incorporate each teacher’s personality into their heart. It’s amazing how paint, burlap, mod podge, and scrapbooking supplies can transform plain wooden shapes.
I really had fun this year for Valentine’s Day!! I’m a wee bit sad that it will be over in 24 hours. I guess I can always start planning for next year. ;)
Linking up here…. check out these awesome parties!
I think Cupid has FINALLY visited this crafty mommy!
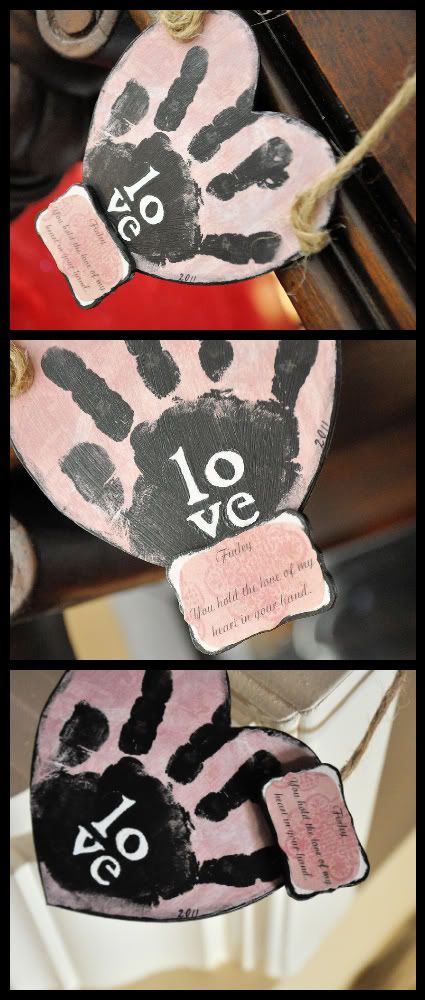
My mom always made Valentine’s Day a very special holiday when I was growing up. It was almost as exciting as my birthday! I was perusing the aisles of Michaels this weekend, ALONE, (I know, right? I NEVER get to do that) when a package of little wooden hearts landed into my cart (literally, fell from the shelf and landed in my cart). I started to put them back, but then visions of my little stink bug’s hand popped into my head.
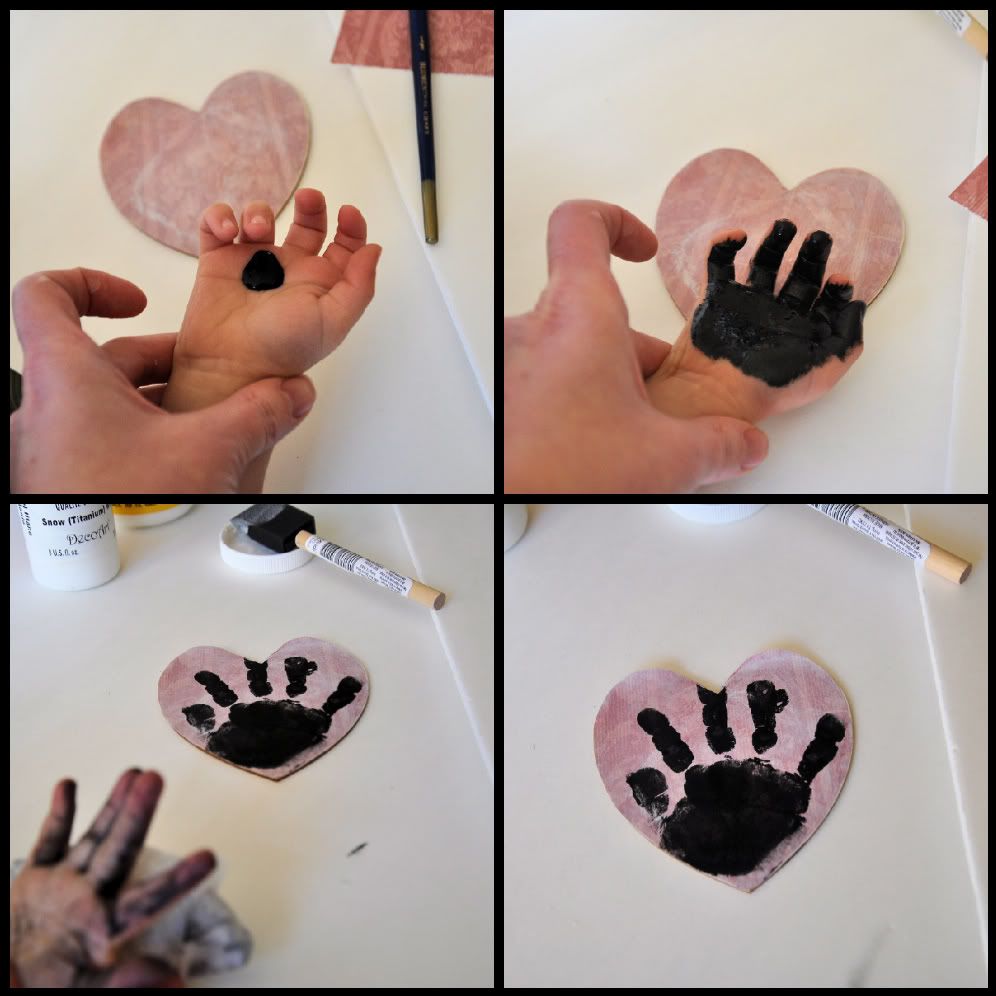
I have a thing with my kids’ handprints and footprints. Can’t help it… I have them in all forms of media randomly strewn throughout my house. It genuinely amazes me at how quickly these tiny little body parts grow. I haven’t captured Finley’s hand mug in a while and pounced on this opportunity. He was such a sweet little boy and surprised me with his cooperation.
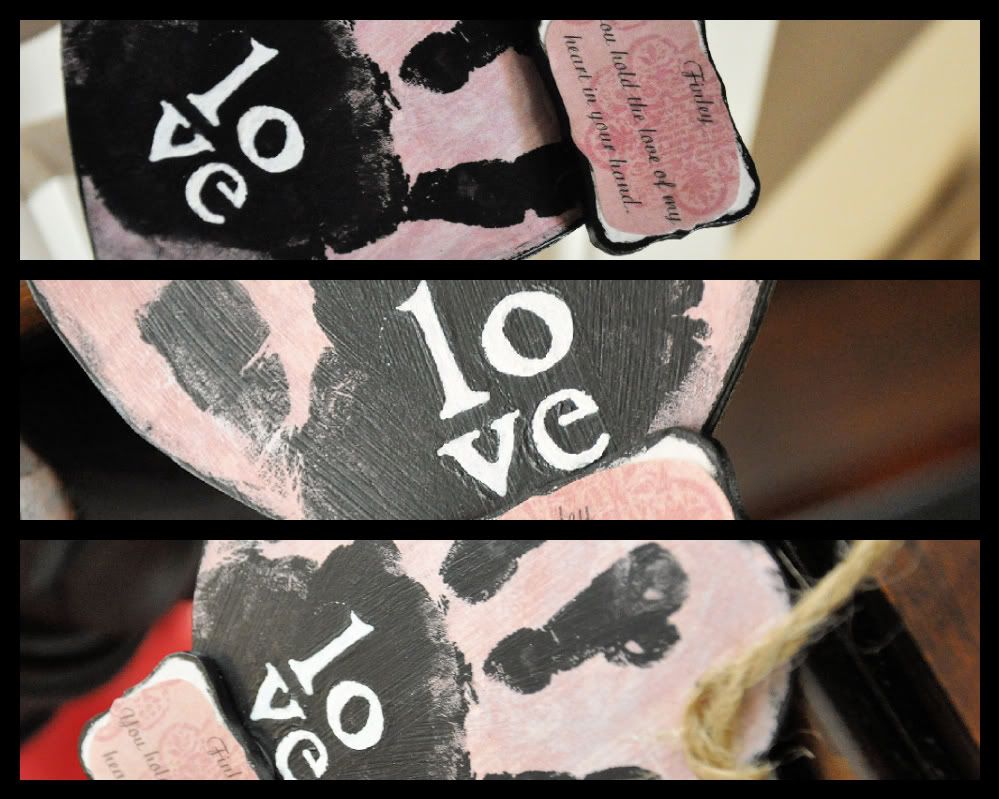
UNTIL I was stenciling and painting… he decided to unroll a 100 yd roll of tulle throughout my dining room and kitchen. I knew the sheer pleasure in those giggles could only be that of mischief!


I had to laugh after I fussed at him. Any who, when he’s a grumpy hormonal teenager, and I want to lock him in his room until he’s 25, I can look back and remember when he held my love in the palm of his hand…
Linking up HERE